DXD Vesting Contract Creation
The below step-by-step instructions outline the detailed process for a DXdao contributor to create a DXD Vesting contract to be used with a contributor payment.
This walkthrough explains how to use Etherscan and MetaMask to help accomplish the task.
How it works
Create your own unique token vesting contract with the desired parameters calling the create function in the TokenVesting Factory
Send the DXD tokens via Alchemy proposal to your token vesting contract
Claim the tokens till the vesting ends. Beware that you will have to wait for the cliff time to be reached and that the vesting might be able to be revoked by the organization.
What you will need:
Your ETH account where you will eventually receive the vested DXD tokens
The start time in format of unix timestamp
The duration of the cliff period in seconds
The total duration of the vesting in seconds
If your contract can be terminated by the DXdao or not
Useful tool for Unix TimeStamp Conversion
Current parameters for DXdao full-time contributors
Your ETH account where you will eventually receive the vested DXD tokens.
Example: 0xed6fA573B2ddB34F6a9a6941b53f7833bF283b02
The start time in format of unix timestamp = The start date of your Contributor Proposal
Example: Start date of 11/01/2020 @ 12:00pm (UTC) is 1604232000
The duration of the cliff period in seconds = 1 year from Start Date
Example: If Cliff date of 11/01/2021 @ 12:00pm (UTC) is 1635768000, the cliff duration is 1635768000 - 1604232000 = 31536000 seconds
The duration of the vesting period in seconds = 2 years from Start Date
Example: If End date of 11/01/2022 @ 12:00pm (UTC) is 1667304000, the cliff duration is 1635768000 - 1604232000 = 63072000 seconds
If your contract can be terminated by the DXdao or not.
Currently, the input would be “false”
Steps to follow:
1) Navigate to the TokenVesting Factory contract on Etherscan
2) Click “Connect to Web3” and connect using MetaMask.
In “1. Create”, you will see the following fields:
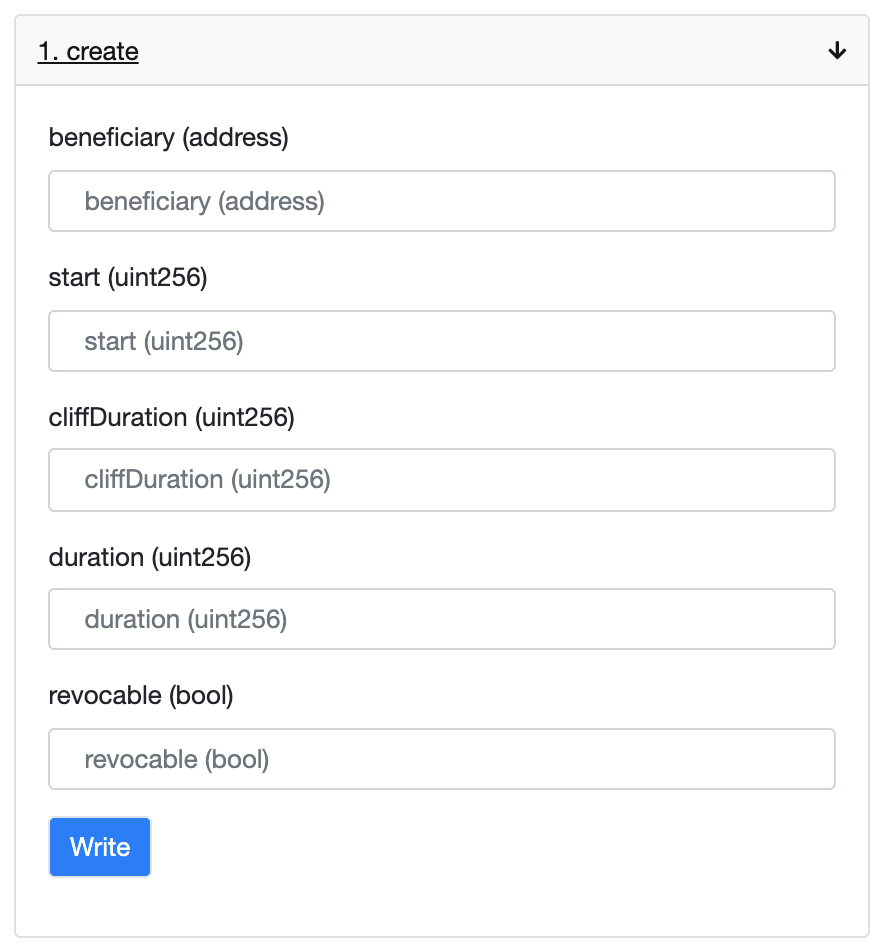
3) Fill in the fields with your calculated inputs.
Using the example inputs:

4) Click the “Write” button.
This brings up a MetaMask window. Click “Confirm”.
5) Once the transaction is mined go to the event logs and look for the event VestingCreated.


vestingContractAddress is the address of your vesting contract. This is where you will request to send your DXD from your Alchemy Proposal.
6) Send your DXD to your vestingContractAddress.
7) Wait until the Start time plus cliffDuration time is reached, at which time you can execute the release function.
The release function will release any vested DXD to the beneficiary (address) already provided.
Enter the DXD token address into the field: 0xa1d65E8fB6e87b60FECCBc582F7f97804B725521
Click “Write”

8) Process Complete.
The process is not too complex, just create your vesting, send your DXD and receive it over time.
NOTE: It is better to do your contract creation when gas prices are low!
Any questions? Reach out to the DXdao Discord, or the DXdao Keybase.